
- Should have basic knowledge with CentOS 7.2-64 bit (NO Graphic User Interface)
- Be careful about name and space in each command
- Be careful about name and space in each command
1. Prepare necessary files for installation by
downloading from website as follow:
- jdk-7u79-linux-x64.rpm (Should be version for 64 bit same as O/S)
- postgresql-9.0.17-1-linux-x64.run (Should be version for 64 bit same as O/S)
2. Start to install by prepare (copy) all files into ‘opt’ directory
and go to ‘opt’ directory by using command cd /opt/
(Using Linux root@... user)
3. After finished copying, You can see all files and rights by using command ls –la
2. Start to install by prepare (copy) all files into ‘opt’ directory
and go to ‘opt’ directory by using command cd /opt/
(Using Linux root@... user)
3. After finished copying, You can see all files and rights by using command ls –la

4. Change mode to java files so it could be execute by
using command
chmod a+x jdk-7u79-linux-x64.rpm
5. Install java by using command sudo rpm –ivh jdk-7u79-linux-x64.rpm


8. After press enter, Then ask for directory for storing data,
If don’t change just press enter to use default (/opt/PostgreSQL/9.0/data)

9. After press enter, Then ask for setting password for database superuser name
‘postgres’

10. After press enter, Next asking for port number of postgresql
(default port no. is 5432)

11. After press enter, it’ll asking for language which showing about 772 sequencing
(by default English is no [1])

12. Finally, to start installation by type ‘Y’ and press enter

13. Wait for just a minute, the screen will show finished for setting up

14. Edit file pg_hba.conf in directory /opt/PostgreSQL/9.0/data by using command
nano /opt/PostgreSQL/9.0/data/pg_hba.conf
it’ll show the screen as below (nano is text editor, should be installed separately
or else please try ‘vi’ or ‘gedit’ command)

15. Restart the postgres service by using command

16. Create ‘java.sh’ file for setting path of Environment Variable to be execute
the postgres commands by using command

Then save and exit
17. Take the ‘java.sh’ file get an effect to the System Environment
by using command
18. Prepare Apache Ant installation, to check installed of apache ant
on your CentOS please use command: (it’ll return the result as below picture)
which ant

19. Go to directory ‘opt’ by using command cd /opt


21. 1. At ‘opt’ directory, prepare Apache Maven installation by typing command

22. Edit ‘java.sh’ file for adding more path of Environment Variable
by typing command

23. Change mode to ‘java.sh’ file to be
execute by typing command
24. Verify for software installations by typing each command step by step
If you’d correct setting, each command for verifying will show the result
as the below picture

25. Next, try to start tomcat server by going to ‘CATALINA_HOME/bin’ directory
by typing command


26. Prepare for installation of Dspace Application

27. Then go to ‘data’ directory by typing command
chmod a+x jdk-7u79-linux-x64.rpm
5. Install java by using command sudo rpm –ivh jdk-7u79-linux-x64.rpm
6. Change mode to postgresql files so it
could be execute by using command
chmod +x postgresql-9.0.17-1-linux-x64.run
7. Install postgresql by using
command ./postgresql-9.0.17-1-linux-x64.run
after press enter , it’ll ask
for installation directory.
If don’t change just press enter to use default (/opt/PostgreSQL/9.0)
If don’t change just press enter to use default (/opt/PostgreSQL/9.0)
8. After press enter, Then ask for directory for storing data,
If don’t change just press enter to use default (/opt/PostgreSQL/9.0/data)
9. After press enter, Then ask for setting password for database superuser name
‘postgres’
(Please remember
your password)
When you type the
password, it doesn’t show anything on screen
then Retype password: again
then Retype password: again
10. After press enter, Next asking for port number of postgresql
(default port no. is 5432)
11. After press enter, it’ll asking for language which showing about 772 sequencing
(by default English is no [1])
12. Finally, to start installation by type ‘Y’ and press enter
13. Wait for just a minute, the screen will show finished for setting up
14. Edit file pg_hba.conf in directory /opt/PostgreSQL/9.0/data by using command
nano /opt/PostgreSQL/9.0/data/pg_hba.conf
it’ll show the screen as below (nano is text editor, should be installed separately
or else please try ‘vi’ or ‘gedit’ command)
Then add this line like this:
# IPv4 local connections:
host all all 127.0.0.1/32 md5
host dspace dspace 127.0.0.1/32 md5
host dspace dspace 127.0.0.1/32 md5
(It’s mean that allow user name is ‘dspace’
to connect to database name is ‘dspace’
or upon the name that you created which should be matched )
to connect to database name is ‘dspace’
or upon the name that you created which should be matched )
Next save and exit
15. Restart the postgres service by using command
service postgresql-9.0 restart
16. Create ‘java.sh’ file for setting path of Environment Variable to be execute
the postgres commands by using command
nano
/etc/profile.d/java.sh
then add the line as below:
PATH=/opt/PostgreSQL/9.0/bin:$JAVA_HOME/bin:$ANT_HOME/bin:
$MAVEN _HOME/bin:$PATH
Then save and exit
17. Take the ‘java.sh’ file get an effect to the System Environment
by using command
source /etc/profile.d/java.sh
18. Prepare Apache Ant installation, to check installed of apache ant
on your CentOS please use command: (it’ll return the result as below picture)
which ant
19. Go to directory ‘opt’ by using command cd /opt
and extract apache ant file by
typing command
tar –zxvf apache-ant-1.8.4-bin.tar
20. At ‘opt’ directory, prepare Apache Tomcat
installation by typing command
tar –zxvf apache-tomcat-7.0.35.tar.gz
21. 1. At ‘opt’ directory, prepare Apache Maven installation by typing command
22. Edit ‘java.sh’ file for adding more path of Environment Variable
by typing command
nano
/etc/profile.d/java.sh
and add the line as below:
JAVA_HOME=/usr/java/jdk1.7.0_79
ANT_HOME=/opt/apache-ant-1.8.4
CATALINA_HOME=/opt/apache-tomcat-7.0.35
MAVEN_HOME=/opt/apache-maven-3.0.4
PATH=/opt/PostgreSQL/9.0/bin:$JAVA_HOME/bin:$ANT_HOME/bin:
$MAVEN _HOME/bin:$PATH
export PATH JAVA_HOME ANT_HOME MAVEN_HOME
export CLASSPATH=.
Then
save and exit
chmod +x
/etc/profile.d/java.sh
and
take
the ‘java.sh’ file get an effect by typing command
source
/etc/profile.d/java.sh
24. Verify for software installations by typing each command step by step
echo $JAVA_HOME (then press enter)
echo $CATALINA_HOME (then press enter)
ant –version (then press enter)
mvn –version (then press enter)
If you’d correct setting, each command for verifying will show the result
as the below picture
25. Next, try to start tomcat server by going to ‘CATALINA_HOME/bin’ directory
by typing command
cd $CATALINA_HOME/bin
(if you’d like to know the
directory that you are working
please type command ‘pwd’ )
please type command ‘pwd’ )
Before starting tomcat, you should
type ‘ls’ command
to see another commands that you could do with
to see another commands that you could do with
Now at directory
/opt/apache-tomcat-7.0.35/bin ,
if you’d like to start tomcat server please type command
if you’d like to start tomcat server please type command
./startup.sh
It’ll show what tomcat is using.
Now try to stop tomcat server by typing
command
./shutdown.sh
26. Prepare for installation of Dspace Application
First of all, Create Dspace
Linux user by typing command
groupadd
dspace (then press enter)
then
typing command
useradd
dspace –g dspace (then press enter)27. Then go to ‘data’ directory by typing command
cd
/opt/PostgreSQL/9.0/data
then
create dspace user for database that named ‘dspace’
by typing command
by typing command
createuser
–U postgres –d –A –P dspace (then press
enter)
just
enter the password for dspace user
(please remember the password for this step)
then
enter the same password again
and
next it’ll ask for create new role .. please type ‘y’ to
allowed
and
the last type the postgres password
(from PostgreSQL installation at step no. 9)
(from PostgreSQL installation at step no. 9)

if you type the wrong
password for postgres user !!
it’ll show an error message as the below pictur
it’ll show an error message as the below pictur

28. Create database name ‘dspace’ by typing command
createdb –U dspace –E
UNICODE dspace
then type Password: of dspace user (upon your setting
at step no.27)
29. Let’s start to install Dspace by going to ‘opt’ directory
by typing command
cd /opt/
then unzip dspace package by
typing command
unzip
dspace-5.0-src-release.zip (then press enter)
if you see alert message
like: ‘-bash:
unzip: command not found’
it meant that you need to
install more unzip package
by typing command
by typing command
yum
install unzip (and
do step by step)
After
finished install, try command unzip again
unzip
dspace-5.0-src-release.zip
30. To preview extract and unzip file in ‘opt’ folder, typing command ls -la

31. Go to root directory by typing command cd /
then create new directory to contain
Dspace application files
by typing
command
mkdir
dspace
To see new directory ‘dspace’
already created or not,
by typing command ls –la
It’ll show the list
names of directory at root and the owner of each folder.
As the below picture,
the owner and group of ‘dspace’ folder is root


32. Change to dspace user by typing command
su dspace


Now try to change ownership and
group of ‘dspace’ directory
from root to dspace user by typing command
from root to dspace user by typing command
chown
dspace.dspace /dspace -R
Then try command ls –la again, the result showed that
ownership and group of ‘dspace’ folder was changed from root to dspace
ownership and group of ‘dspace’ folder was changed from root to dspace
And change ownership and group
of ‘dspace-5.0-src-release’ directory
from root to dspace user by typing command
from root to dspace user by typing command
chown dspace.dspace
/opt/dspace-5.0-src-release -R
32. Change to dspace user by typing command
su dspace
Then edit dspace configuration
file (dspace.cfg) before installation
by typing command
by typing command
nano
/opt/dspace-5.0-src-release/dspace/config/dspace.cfg
next, looking for the below line
dspace.dir =
${dspace.install.dir} -> just remark this line
by using symbol ‘#’
and type new line as:
dspace.dir
= /dspaceby using symbol ‘#’
and type new line as:
Then save and exit
33. Next, go to dspace application
directory by typing command
cd
/opt/dspace-5.0-src-release/dspace
so now you are working
with dspace user at directory of
/opt/dspace-5.0-src-release/dspace as the below picture


34. Next, go to ‘dspace-installer’ directory by typing
command
cd /opt/dspace-5.0-src-release/dspace/target/dspace-installer


to see what’s changing by typing command
ls –la /dspace

37. Set dspace path for Tomcat Server by following
these steps:
Then begin the compilation by
typing command
mvn
package
It’ll start downloading dspace
version 5.0 package from the internet,
in this step might take a long time upon
version of dspace
(newer version might take a longer time) and also your
internet speed.
As I tried, it took times about
40 minutes.
After that it showed message ‘BUILD SUCCESS’
cd /opt/dspace-5.0-src-release/dspace/target/dspace-installer
Then type command ‘ant fresh_install’ (just a minute)
It’ll show message ‘BUILD
SUCCESSFUL’
35. After ‘ant fresh_install’
, try to check ‘/dspace’ directory to see what’s changing by typing command
ls –la /dspace
It’ll find that there’re many files
that were installed in ‘/dspace’ directory
and about ownership and group of all files will be for ‘dspace’ user.
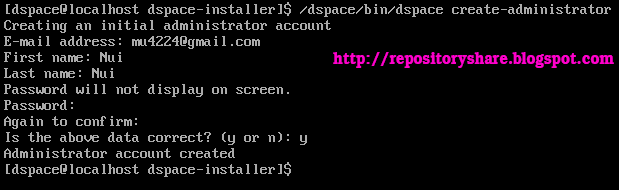
36. Then create Administrator account for
dspace by typing commandand about ownership and group of all files will be for ‘dspace’ user.
/dspace/bin/dspace create-administrator
First name: [type any name] (then press enter)
Last name: : [type any name] (then press enter)
Password: : [type your wishes password] (then press enter)
Again to confirm: : [Confirm your password again] (then press enter)
Is the above data correct: [Press Y to confirm the above data input]
Last name: : [type any name] (then press enter)
Password: : [type your wishes password] (then press enter)
Again to confirm: : [Confirm your password again] (then press enter)
Is the above data correct: [Press Y to confirm the above data input]
- Change to root user by typing command
cd / then
su and
enter root password as the below picture
- Go to ‘localhost’ directory by typing command
cd /opt/apache-tomcat-7.0.35/conf/Catalina/localhost

- Create 4 files in this ‘localhost’
directory
and set named to jspui.xml,
xmlui.xml, oai.xml
and solr.xml
You
should do one by one (First, create jspui.xml)
by typing command
nano jspui.xml
and add the below line to jspui.xml file
<Context path=“/jspui” docBase=“/dspace/webapps/jspui” debug=“0”
reloadable=“true” cachingAllowed=“false” crosscontext=“true” />
reloadable=“true” cachingAllowed=“false” crosscontext=“true” />
Then save and exit
nano xmlui.xml

and add the below line to xmlui.xml file
<Context path=“/xmlui” docBase=“/dspace/webapps/xmlui” debug=“0”
reloadable=“true” cachingAllowed=“false” crosscontext=“true” />
reloadable=“true” cachingAllowed=“false” crosscontext=“true” />
Then save and exit
Next, create oai.xml file by typing
command
nano oai.xml

and add the below line to oai.xml file
<Context path=“/oai” docBase=“/dspace/webapps/oai” debug=“0”
reloadable=“true” cachingAllowed=“false” crosscontext=“true” />
Then save and exit
reloadable=“true” cachingAllowed=“false” crosscontext=“true” />
Then save and exit
Next, create solr.xml file by typing
command
nano solr.xml

and add the below line to solr.xml file
<Context path=“/solr” docBase=“/dspace/webapps/solr” debug=“0”
reloadable=“true” cachingAllowed=“false” crosscontext=“true” />
Then save and exitreloadable=“true” cachingAllowed=“false” crosscontext=“true” />
from ‘root’ to ‘dspace’ user. Before changing, you can check
the name of ownership and group of apache-tomcat directory
by typing command
ls –la /opt/apache-tomcat-7.0.35
the result showed that the ownership and group of
this directory are ‘root’

Now, please change the ownership and group of apache-tomcat directory
from ‘root’ to ‘dspace’ user by following these steps
- Type command cd /opt (change to /opt directory)
- Type command chown
dspace.dspace apache-tomcat-7.0.35/ -R
chown dspace.dspace apache-tomcat-7.0.35/ -R
- Check the result from changing by typing command
ls –la /opt/apache-tomcat-7.0.35
it’ll show the result that the ownership and group of files
in apache-tomcat directory were changed from ‘root’ to ‘dspace’ user
it’ll show the result that the ownership and group of files
in apache-tomcat directory were changed from ‘root’ to ‘dspace’ user

39. Next, change to dspace user by typing command
su dspace
and change the working directory from
‘opt’ to apache-tomcat directory
by typing command
by typing command
cd $CATALINA_HOME/bin
Then start tomcat server (for running
dspace application)
by typing command
./startup.sh by typing command
(After startup tomcat server, you
need to wait for a few seconds
before opening dspace webpage on web browser)
before opening dspace webpage on web browser)

40. Try to open dspace webpage by using any web browser (for me, using Chrome)
and type url ‘http://localhost:8080/jspui/’ (or represent the word ‘localhost’
by ip
address of your computer, for example ‘http://192.168.221.136:8080/jspui/’
)
For JSPUI interface, the
advantage point is that it’ll be responsive web (resize
webpage upon your computer or mobile device screen).
webpage upon your computer or mobile device screen).

or else you can login to xmlui
web interface by typing url
‘http://localhost:8080/xmlui/’ (or represent the word ‘localhost’
‘http://localhost:8080/xmlui/’ (or represent the word ‘localhost’
by ip
address of your computer, for example ‘http://192.168.221.136:8080/xmlui/’
)
But for xmlui interface, it’ll
not be responsive web
(not resize webpage upon your computer or mobile device
screen).

41. Set automatic starting apache-tomcat server on any boot time
by following these steps (Site Reference:
http://www.mysamplecode.com/2012/05/automatically-start-tomcat-linux-centos.html)
- Type command cd /etc/init.d
- Type command nano tomcat7
(Create new service name ‘tomcat7’)
Then copy the following codes into this ‘tomcat7’ file
(Create new service name ‘tomcat7’)
Then copy the following codes into this ‘tomcat7’ file
#!/bin/bash
# chkconfig: 2345 80 20
# Description: Tomcat Server basic start/shutdown script
# /etc/init.d/tomcat7 -- startup script for the Tomcat 7 servlet engine
TOMCAT_HOME=/opt/apache-tomcat-7.0.35/bin
START_TOMCAT=/opt/apache-tomcat-7.0.35/bin/startup.sh
STOP_TOMCAT=/opt/apache-tomcat-7.0.35/bin/shutdown.sh
start() {
echo -n "Starting tomcat7: "
cd $TOMCAT_HOME
${START_TOMCAT}
echo "done."
}
stop() {
echo -n "Shutting down tomcat7: "
cd $TOMCAT_HOME
${STOP_TOMCAT}
echo "done."
}
case "$1" in
start)
start
;;
stop)
stop
;;
restart)
stop
sleep 10
start
;;
*)
echo "Usage: $0 {start|stop|restart}"
esac
exit 0
save and exit
save and exit
- To update file permissions for any users to make
executable
by typing command
by typing command
chmod 755 tomcat7
- If ‘chkconfig’ do not install on your
CentOS
please install by using command
please install by using command
yum install chkconfig (then following step by step for suggestion)
- After finished install, type command
chkconfig --add tomcat7
- Try to run the find command to check startup
services
by typing command
by typing command
find . –name “*tomcat7”
you’ll get the response message as below picture

- Check the ‘tomcat7’ file
script already added to the startup services
by typing command
by typing command
chkconfig --list tomcat7
you’ll get the result as the below picture:
you’ll get the result as the below picture:

- After finished setting up, please
restart your CentOS by typing command
shutdown –r now
and when it came back just open your dspace webpage
without manually restart apache-tomcat server
shutdown –r now
and when it came back just open your dspace webpage
without manually restart apache-tomcat server
- If you’d like to stop the Tomcat
server by manually please type the command
service tomcat7 stop
It’ll show you for Shutting down tomcat7 service
It’ll show you for Shutting down tomcat7 service

Then if you wish to start it again please type the
command
service tomcat7 start
Thank you for your attention, See you on next post.

Keyword: install dspace 5 on windows, install dspace 5 ,ติดตั้ง dspace, install dspace, institutional repository, ir, คลังข้อมูล, คลังสารสนเทศ, คลังสถาบัน, คลังเอกสาร, ติดตั้ง dspace 5, ติดตั้งดีเสปซ, dspace 5 on windows, การใช้งาน dspace เบื้องต้น, คู่มือการใช้ dspace, dspace คู่มือ, โปรแกรม dspace, การติดตั้ง dspace, การติดตั้ง dspace 5, dspace installation on windows, dspace installation on centos, dspace installation step by step, dspace 5 installation, dspace 5.0 installation
Great Job. Installation Done. Thanks.
ReplyDelete