DSpace 6 database schema (PostgreSQL)
Reference:
https://wiki.duraspace.org/display/DSDOC6x/Storage+Layer#StorageLayer-RDBMS/DatabaseStructure
Keyword: dspace database schema
Institutional Repository Share Blog
คลังข้อมูล, คลังสารสนเทศ, คลังสถาบัน, ติดตั้ง dspace, install dspace, institutional repository, dspace 6 installation
Wednesday, March 20, 2019
Thursday, February 15, 2018
Installing Dspace 5.7 On Ubuntu 16.04.3 LTS
Installing Dspace 5.7 On Ubuntu 16.04.3 LTS
Install Openssh
sudo apt-get install openssh-server
sudo service ssh status
1. sudo apt-get install openjdk-8-jdk
if you found this problem
...E:Could not get lock /var/lib/dpkg/lock’
please try this steps to fix it
a. ps aux | grep -i apt
b. sudo kill -9 processid (look at sudo apt update)
c. Then kill all process about '..apt..'
or more details
How to Fix 'E:Could not get lock /var/lib/dpkg/lock’ Error in Ubuntu
Ref: https://itsfoss.com/could-not-get-lock-error/
2. set JAVA_HOME
sudo vi ~/.bashrc or
sudo nano ~/.bashrc
[add the next two lines below]
export JAVA_HOME=/usr/lib/jvm/java-1.8.0-openjdk-amd64
export PATH=$PATH:$JAVA_HOME
3. Install maven
sudo apt-get install maven
4. Install postgresql
sudo apt-get install postgresql
5. Download tomcat
wget https://archive.apache.org/dist/tomcat/tomcat-8/v8.5.24/bin/apache-tomcat-8.5.24.tar.gz
6. Extracting tomcat
tar -xvzf apache-tomcat-8.5.24.tar.gz
7. Changing to directory /opt
sudo mv apache-tomcat-8.5.24 /opt
8. Change directory name to 'tomcat'
sudo mv /opt/apache-tomcat-8.5.24 /opt/tomcat
9. Add group name of 'tomcat'
sudo groupadd tomcat
10. Increase user name 'tomcat'
sudo useradd -s /bin/false -g tomcat -d /opt/tomcat tomcat
* -s /bin/false ==> set shell to be 'false' to prevent using 'tomcat' login name
* -g tomcat ==> set this user name to be group of 'tomcat'
* -d /opt/tomcat ==> set home directory to be '/opt/tomcat'
11. Changing group owner of path '/opt/tomcat' to be group of 'tomcat'
sudo chgrp -R tomcat /opt/tomcat/
12. Setting group owner to be read and execute path of '/opt/tomcat/conf '
(&& is use for running with more than one command at the same time)
sudo chmod -R g+r /opt/tomcat/conf && sudo chmod g+x /opt/tomcat/conf
13. Changing user owner path of webapps/ work/ temp/ logs/ to be user of tomcat
cd /opt/tomcat
sudo chown -R tomcat webapps/ work/ temp/ logs/
14. Creating service name 'tomcat'
sudo vi /etc/systemd/system/tomcat.service or
sudo nano /etc/systemd/system/tomcat.service
Add some lines below into 'tomcat.service'
[Unit]
Description=Apache Tomcat Web Application Container
After=network.target
[Service]
Type=forking
Environment=JAVA_HOME=/usr/lib/jvm/java-1.8.0-openjdk-amd64/jre
Environment=CATALINA_PID=/opt/tomcat/temp/tomcat.pid
Environment=CATALINA_HOME=/opt/tomcat
Environment=CATALINA_BASE=/opt/tomcat
Environment='CATALINA_OPTS=-Xms512M -Xmx1024M -server -XX:+UseParallelGC'
Environment='JAVA_OPTS=-Djava.awt.headless=true -Djava.security.egd=file:/dev/./urandom'
ExecStart=/opt/tomcat/bin/startup.sh
ExecStop=/opt/tomcat/bin/shutdown.sh
User=tomcat
Group=tomcat
UMask=0007
RestartSec=10
Restart=always
[Install]
WantedBy=multi-user.target
15.Reloading systemd daemon
sudo systemctl daemon-reload
16.starting tomcat service and check the working status
sudo systemctl start tomcat
sudo systemctl status tomcat
17.Let's service tomcat always start up after restarting
sudo systemctl enable tomcat
18.To be config tomcat (For Thai language)
sudo /opt/tomcat/conf/server.xml or
sudo nano /opt/tomcat/conf/server.xml
by adding property -> URIEncoding="UTF-8" to tag Connector
Then it became
<Connector port="8080" protocol="HTTP/1.1"
connectionTimeout="20000"
redirectPort="8443" URIEncoding="UTF-8"/>
19.Setting authentication of postgresql to be 'trust' for allowing to create database to 'dspace'
sudo vi /etc/postgresql/9.5/main/pg_hba.conf or
sudo nano /etc/postgresql/9.5/main/pg_hba.conf
by changing the line below
local all postgres peer
..and change to be..
local all postgres trust
Then restart service postgresql with command 'sudo service postgresql restart'
20.download DSpace Installer with command
wget https://github.com/DSpace/DSpace/releases/download/dspace-5.7/dspace-5.7-release.zip
21. Copying DSpace Installer to directory name '/srv'
sudo cp dspace-5.7-release.zip /srv
22. Unzip Dspace Installer
cd /srv
sudo unzip /srv/dspace-5.7-release.zip
* Requirement to install unzip package by using command 'sudo apt-get install zip'
23. Create user name is 'dspace'
sudo useradd -m dspace
24. Next, create database user
sudo su - postgres
createuser --username=postgres --no-superuser --pwprompt dspace
(type password 'dspace' )
* --username=postgres ==> Login user name for logging into database to create new database user
* --no-superuser ==> Setting new created user without 'superuser'
* --pwprompt ==> Setting new password of user
* dspace ==> Name of user will be creating
25.Create new Database name is 'dspace' by using 'postgres' user
and assign owner to user 'dspace'
sudo su - postgres
createdb --username=postgres --owner=dspace --encoding=UNICODE dspace
* --username=postgres ==> Login user name for logging into database to create new database name
* --owner=dspace ==> Setting database owner
* --encoding=UNICODE ==> Setting encoding to be UNICODE
* dspace ==> Name of database will be creating
26. Creating folder name 'dspace' in directory '/srv'
sudo mkdir /srv/dspace
27. Changing owner of folder '/srv/dspace' to be dspace user
sudo chown dspace /srv/dspace
28. Changing configuration in 'build.properties' of installer
sudo vi /srv/dspace-5.7-release/build.properties or
sudo nano /srv/dspace-5.7-release/build.properties
[Changing some lines below]
dspace.install.dir = /srv/dspace
dspace.ui = jspui
dspace.name = Name of Institutional Repository
db.url=jdbc:postgresql://localhost:5432/dspace
db.username=user1
db.password=user1
mail.server = smtp.example.com
mail.server.username=
mail.server.password=
mail.from.address = dspace-noreply@myu.edu
mail.feedback.recipient = dspace-help@myu.edu
mail.admin = dspace-help@myu.edu
handle.canonical.prefix = ${dspace.url}/handle/
handle.prefix = 123456789
29. To build DSpace Installer
cd /srv/dspace-5.7-release
mvn package
*Wating for 20-40 Minutes (Based on speed of each internet networking)
30.Installing DSpace
cd /srv/dspace-5.7-release/dspace/target/dspace-installer
ant fresh_install
31. Setting user for managing 'tomcat' through UI
sudo vi /opt/tomcat/conf/tomcat-users.xml or
sudo nano /opt/tomcat/conf/tomcat-users.xml
under tag of 'tomcat-users' add below message to the last line
so it will be
.........
<user username="admin" password="xxxxx" roles="manager-gui,admin-gui"/>
</tomcat-users>
32.To allow tomcat from any client can be remoting
Edit at the directory of ....../manager/......
sudo vi /opt/tomcat/webapps/manager/META-INF/context.xml or
sudo nano /opt/tomcat/webapps/manager/META-INF/context.xml
and Edit at the directory of ....../host-manager/......
sudo vi /opt/tomcat/webapps/host-manager/META-INF/context.xml or
sudo nano /opt/tomcat/webapps/host-manager/META-INF/context.xml
comment or remark the next line below of both file the above
so it will change from
<Valve className="org.apache.catalina.valves.RemoteAddrValve"
allow="127\.\d+\.\d+\.\d+|::1|0:0:0:0:0:0:0:1" />
to be
<!-- <Valve className="org.apache.catalina.valves.RemoteAddrValve"
allow="127\.\d+\.\d+\.\d+|::1|0:0:0:0:0:0:0:1" /> -->
33. Then restart service tomcat with command 'sudo systemctl restart tomcat'
34.Creating web app. through UI by logging into 'http://[host]:8080/manager'
example:
http://dspaceweb.com:8080/manager or
http://9.9.9.9:8080/manager
(if found error 403 Access Denied, please go back to check no.32 again !!)
Context Path (required) ==> select path on web site such as: /solr
WAR or Directory URL ==> path of project such as: /srv/dspace/webapps/solr
35. Otherwise, creating web app. into '/opt/tomcat/conf/server.xml'
sudo nano /opt/tomcat/conf/server.xml
by adding next line below
<Context path="" docBase=""></Context> within tag Host </Host> !!
For example,
<Context path="/jspui" docBase="/srv/dspace/webapps/jspui"></Context>
<Context path="/oai" docBase="/srv/dspace/webapps/oai"></Context>
<Context path="/rdf" docBase="/srv/dspace/webapps/rdf"></Context>
<Context path="/rest" docBase="/srv/dspace/webapps/rest"></Context>
<Context path="/solr" docBase="/srv/dspace/webapps/solr"></Context>
<Context path="/sword" docBase="/srv/dspace/webapps/sword"></Context>
<Context path="/sword2" docBase="/srv/dspace/webapps/sword2"></Context>
<Context path="/xmlui" docBase="/srv/dspace/webapps/xmlui"></Context>
36. Creating Administrator account to manage Dspace system
/srv/dspace/bin/dspace create-administrator
37. Opening REST API Service
by setting web app point to '/srv/dspace/webapps/rest'
So, it should be
<Context path="/rest" docBase="/srv/dspace/webapps/rest"></Context>
* In case of using REST API with common http,
it need to be comment out in '/srv/dspace/webapps/rest/WEB-INF/web.xml'
nano /srv/dspace/webapps/rest/WEB-INF/web.xml
* by comment out at '<security-constraint>'
change from
<security-constraint> .......................................
........................................................................
</security-constraint>
to be
<!-- <security-constraint> .......................................
........................................................................
</security-constraint> -->
38. Changing jsp file
* For any changed of 'home.jsp', you need to be copy 'home.jsp' into folder '/srv/dspace-5.7-release/dspace/modules/jspui/src/main/webapp'
* Then run command 'mvn package' in path of /srv/dspace-5.7-release/dspace
*and next run command 'ant -Dconfig=/srv/dspace/config/dspace.cfg'
in the directory of '/srv/dspace-5.7-release/dspace/target/dspace-installer'
* Then restart service tomcat with command 'sudo systemctl restart tomcat'
39. Before to be continue the next step, please try to do backup /ROOT in
/opt/tomcat/webapps by using this command
sudo cp -avr /opt/tomcat/webapps/ROOT /opt/tomcat/webapps/ROOT-backup
Next, In case of using jspui, you need to be copy file from directory '/srv/dspace/webapps/jspui'
to replace into '/opt/tomcat/webapps/ROOT'
by using this command
cp -avr /srv/dspace/webapps/jspui/* /opt/tomcat/webapps/ROOT
chown -R tomcat:tomcat /opt/tomcat/webapps/ROOT
and for solr,
need to be copy file from directory '/srv/dspace/webapps/solr' to replace into
/opt/tomcat/webapps/solr
Thursday, June 1, 2017
Dspace 6 Customization For Windows 7 - 64 bit
Customizing the JSPUI pages
For the earlier post about Dspace 6 Installation on Windows 7 - 64 bit ,
after finished DSpace version 6 installation, you should see the screen of webpage as the picture below which can be customized upon your purpose by default is 'JSPUI template'.
The basically for testing layout customization , please open the directory
c:\apache-tomcat-7.0.69\webapps\ROOT\layout
(For this example, I'd changed directory's name from 'jspui' to 'ROOT')
The picture below is the default screen of dspace homepage without any customization.
The picture below is the default screen of dspace homepage without any customization.
*********************************************************************************************************
Example 1 : Hidden or Replace 'DSpace JSPUI description' on header
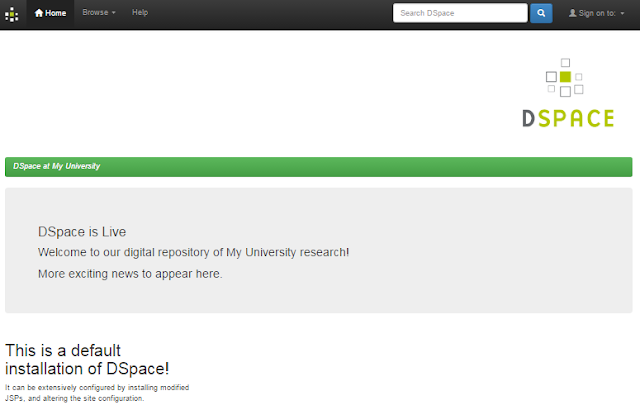
Instructions:
1. Open filename 'header-default.jsp' in c:\apache-tomcat-7.0.69\webapps\ROOT\layout\
with any text editor (such as: Notepad++ / Editplus etc. )
2. If you'd like to hidden, take a look at line no. about 135 and remark on two lines as below and save file.
but if you'd like to replace anything, could replace here without comment.
3. Go back to your dspace homepage on web browser and try to refresh your screen by press F5 on keyboard and get the result.
*********************************************************************************************************
Example 2 : Hidden or Replace 'DSpace JSPUI Logo' on header
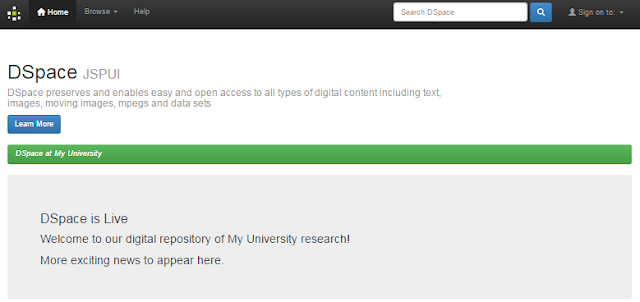
Instructions:
but if you'd like to replace by another logo, could replace here without comment.
3. Go back to your dspace homepage on web browser and try to refresh your screen by press F5 on keyboard and get the result.
*********************************************************************************************************
Example 3 : Changing the 'DSpace Name' at Green Bar

Instructions:
The default of dspace name at green bar is 'DSpace at My University' but if you'd like to change to another name please follow these steps:
*********************************************************************************************************
Example 4 : Changing the message at 'DSpace is Live..' area

Instructions:
If you'd like to change messages at box area of 'DSpace is Live...' please follow these steps::
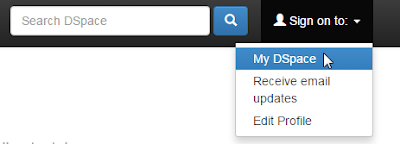
2. Please login with an E-mail Address: and Password: from creating Administrator account for DSpace since the step of Install Dspace 6 on Windows 7 - 64 bit
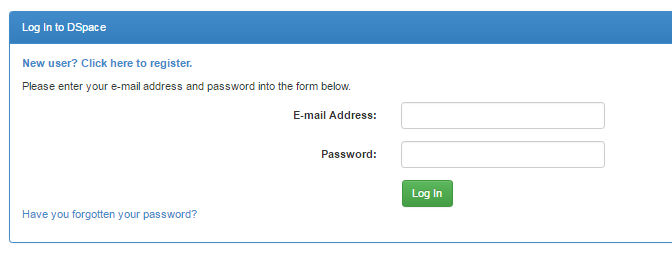
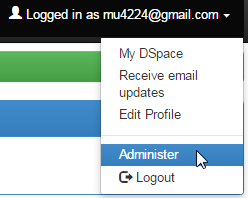
3. Click at E-mail name on the top-right of screen and click Administer
4. Click at menu 'General Settings' and click 'Edit News'
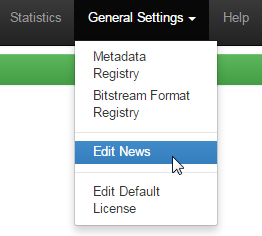
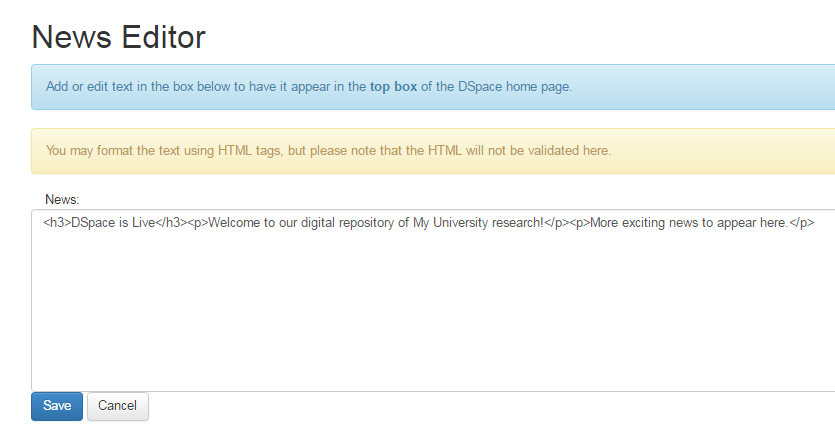
5. click at 'Top News' then click 'Edit' button

6. You can change any messages at 'News' box , it's better to have knowledge about html language for customizing. After finished, then click Save
*********************************************************************************************************
Keywords: dspace 6 customization, JSPUI Configuration and Customization
*********************************************************************************************************
Example 2 : Hidden or Replace 'DSpace JSPUI Logo' on header

Instructions:
1. Open filename 'header-default.jsp' in c:\apache-tomcat-7.0.69\webapps\ROOT\layout\
with any text editor (such as: Notepad++ / Editplus etc. )
with any text editor (such as: Notepad++ / Editplus etc. )
2. If you'd like to hidden, take a look at line no. about 138 and remark on three lines as below and save file.
but if you'd like to replace by another logo, could replace here without comment.
3. Go back to your dspace homepage on web browser and try to refresh your screen by press F5 on keyboard and get the result.
*********************************************************************************************************
Example 3 : Changing the 'DSpace Name' at Green Bar

Instructions:
The default of dspace name at green bar is 'DSpace at My University' but if you'd like to change to another name please follow these steps:
1. Open 'dspace.cfg' in directory 'c:\dspace\config\' and change configuration at line no. about 47 to the new name then save and close text editor.
2. Go back to your dspace homepage on web browser and try to refresh your screen by press F5 on keyboard and get the result.
(Tips! For Windows, after customized the configuration, it's not necessary to restart apache tomcat service but Linux must be)
*********************************************************************************************************
Example 4 : Changing the message at 'DSpace is Live..' area

Instructions:
If you'd like to change messages at box area of 'DSpace is Live...' please follow these steps::
1. On the top-right of the screen, click at menu 'Sign on to: ' and click 'My DSpace'

2. Please login with an E-mail Address: and Password: from creating Administrator account for DSpace since the step of Install Dspace 6 on Windows 7 - 64 bit

3. Click at E-mail name on the top-right of screen and click Administer

4. Click at menu 'General Settings' and click 'Edit News'

5. click at 'Top News' then click 'Edit' button

6. You can change any messages at 'News' box , it's better to have knowledge about html language for customizing. After finished, then click Save

*********************************************************************************************************
Keywords: dspace 6 customization, JSPUI Configuration and Customization
Wednesday, May 31, 2017
ติดตั้ง Dspace เวอร์ชั่น 6 บน ระบบปฏิบัติการ Windows 7 แบบ 64 bit

[Click here to see this post in English]
[ คำแนะนำก่อนการติดตั้ง]
- ผู้ติดตั้งจำเป็นต้องมีความรู้พื้นฐานในการใช้งานคำสั่งต่าง ๆ บนระบบปฏิบัติการ Windows 7 แบบ 64 bit
- ระมัดระวังในการพิมพ์คำสั่ง ตัวสะกด เว้นวรรค ตัวอักษรพิมพ์เล็ก พิมพ์ใหญ่ต่าง ๆ ซึ่งมีผลต่อความถูกต้องสำหรับการทดสอบใช้งาน
1. ให้จัดเตรียมไฟล์โปรแกรมที่จำเป็นในการติดตั้งดังต่อไปนี้ (หรือดาวน์โหลดได้จากลิงค์ด้านล่างนี้) ไว้ในเครื่องที่จะติดตั้ง โดยอาจวางไว้บน desktop เพื่อให้เห็นได้ง่าย :
2. เริ่มดำเนินการติดตั้งในขั้นตอนแรก โดยให้แตกไฟล์ที่มีนามสกุล .zip ทุกไฟล์ ไว้ที่ไดรฟ์ c:\
โดยมีชื่อโฟลเดอร์ดังตัวอย่างด้านล่าง
c:\apache-ant-1.8.0
โดยมีชื่อโฟลเดอร์ดังตัวอย่างด้านล่าง
c:\apache-ant-1.8.0
c:\apache-maven-3.1.0
c:\apache-tomcat-7.0.69
c:\dspace-6.0-src-release
ของ administrator เพื่อป้องกันข้อผิดพลาดที่อาจเกิดขึ้นระหว่างการติดตั้ง
โดยคลิกที่ 'Run as administrator'

คลิกปุ่ม Next to เพื่อดำเนินการในขั้นตอนถัดไป


เมื่อปรากฎปุ่ม Close ให้คลิกเพื่อเสร็จสิ้นการติดตั้งโปรแกรม java

4. ถัดไปให้ติดตั้งโปรแกรมจัดการฐานข้อมูล โดยดับเบิ้ลคลิกที่ชื่อไฟล์ 'postgresql-9.5.2-1-windows.exe'


คลิกปุ่ม Next to เพื่อดำเนินการในขั้นตอนถัดไป

โปรแกรมจะแสดงตำแหน่งโฟลเดอร์ที่จะทำการติดตั้ง ถ้าไม่ต้องการเปลี่ยนให้คลิกปุ่ม Next
เพื่อไปยังขั้นตอนถัดไป

ถัดมาโปรแกรมจะแสดงตำแหน่งโฟลเดอร์ที่จะจัดเก็บข้อมูลฐานข้อมูล (data)
ถ้าไม่ต้องการเปลี่ยนแปลง ให้คลิกปุ่ม Next เพื่อไปยังขั้นตอนถัดไป

ถัดมาให้กำหนดรหัสผ่านให้กับ user ชื่อ postgres ซึ่งเป็น user ที่มีสิทธิ์แบบ superuser,
เมื่อตั้งรหัสผ่านแล้วให้จดไว้เพื่อกันลืม หรือจำให้ได้ แล้วคลิกปุ่ม Next เพื่อไปยังขั้นตอนถัดไป

ถัดมาโปรแกรมจะถามถึง port เพื่อใช้สำหรับการเชื่อมต่อการทำงาน ค่าปกติของ port คือ 5432
หากไม่มีการเปลี่ยนแปลงให้คลิกปุ่ม Next เพื่อไปยังขั้นตอนถัดไป

ถัดมาให้เลือกรูปแบบของภาษาที่ต้องการใช้งาน โดยอาจเลือกให้สอดคล้องกับสถานที่อยู่ของเรา
ถ้าเป็นของไทยให้เลือก Thai, Thailand แล้วให้คลิกปุ่ม Next เพื่อไปยังขั้นตอนถัดไป

ถัดมาให้คลิกปุ่ม Next เพื่อเริ่มการติดตั้งโปรแกรม PostgreSQL

ใช้เวลาสัก 2-3 นาที เพื่อติดตั้งโปรแกรม

เมื่อถึงหน้าต่างสุดท้ายของการติดตั้งโปรแกรม ให้คลิกยกเลิกเครื่องหมายถูกหน้ากล่อง 'Stack Builder...'
และคลิกปุ่ม Finish เพื่อเสร็จสิ้นการติดตั้งโปรแกรม PostgreSQL

5. ขั้นตอนถัดไปให้ตั้งค่าสภาพแวดล้อมการใช้งานของโปรแกรมต่าง ๆ ที่แตกไว้ในไดร์ฟ c:\ ในข้างต้น หรือที่ติดตั้งไว้เพื่อให้สามารถเรียกใช้คำสั่งการทำงานของโปรแกรมที่ต้องการได้อย่างถูกต้อง โดยคลิกเมาส์ขวาที่ Computer และคลิก Properties

และคลิกที่ Advanced system settings

ที่หน้าต่างแถบ Advanced ให้คลิกที่ปุ่ม Environment Variables..

ที่กรอบหน้าต่าง System variables ให้คลิกที่ Path และคลิกปุ่ม Edit เพื่อแก้ไขการตั้งค่า

ให้ใส่เครื่องหมาย ; (semicolon) เพื่อแยกตำแหน่งไดเรกทอรีหรือโฟลเดอร์ของแต่ละโปรแกรม โดยตั้งค่าตำแหน่งของโปรแกรม apache-ant ที่จะเรียกใช้งานตามภาพดังนี้
;c:\apache-ant-1.8.0\bin

ถัดมาตั้งค่าเรียกการใช้งานคำสั่งของโปรแกรม apache-maven ดังนี้
;c:\apache-maven-3.1.0\bin

ถัดมาตั้งค่าเรียกการใช้งานคำสั่งของโปรแกรม java ดังนี้
;c:\Program Files\Java\jdk1.7.0_79\bin

ถัดมาตั้งค่าเรียกการใช้งานคำสั่งของโปรแกรม apache-tomcat ดังนี้
;c:\apache-tomcat-7.0.69\bin

ถัดมาตั้งค่าเรียกการใช้งานคำสั่งของโปรแกรม PostgreSQL ดังนี้
;c:\Program Files (x86)\PostgreSQL\9.5\bin
เมื่อตั้งค่าเสร็จแล้วให้คลิกปุ่ม OK เพื่อเสร็จสิ้นการตั้งค่าในส่วนของ System Variable

ที่กรอบหน้าต่าง 'User variables for Administrator' ให้คลิกปุ่ม New...
เพื่อตั้งค่าการใช้งานของโปรแกรมเพิ่มเติม

กำหนดค่าการใช้งานของ JAVA_HOME ดังนี้
ในช่อง Variable name: พิมพ์ 'JAVA_HOME'
และในช่อง Variable value: พิมพ์ 'c:\Program Files\Java\jdk1.7.0_79'
และคลิกปุ่ม OK เพื่อบันทึการตั้งค่า

กำหนดค่าการใช้งานของ ANT_HOME ดังนี้
ในช่อง Variable name: พิมพ์ 'ANT_HOME'
และในช่อง Variable value: พิมพ์ 'c:\apache-ant-1.8.0'
และคลิกปุ่ม OK เพื่อบันทึการตั้งค่า

กำหนดค่าการใช้งานของ CATALINA_HOME ดังนี้
ในช่อง Variable name: พิมพ์ 'CATALINA_HOME'
และในช่อง Variable value: พิมพ์ 'c:\apache-tomcat-7.0.69'
และคลิกปุ่ม OK เพื่อบันทึการตั้งค่า

เมื่อเสร็จสิ้นการตั้งค่าที่หน้าต่าง 'Environment Variables' ให้คลิกปุ่ม OK

คลิกปุ่ม OK อีกครั้งเพื่อทำการปิดหน้าต่าง System Properties

6. ทดสอบการเรียกใช้งานคำสั่งของโปรแกรมต่าง ๆ ข้างต้น โดยเปิดหน้าต่างโปรแกรม command ของ windows หรือ คลิกที่ปุ่ม Start -> ในช่อง Search program and files พิมพ์ 'cmd.exe'

ทดสอบพิมพ์คำสั่ง ' java -version' และกดปุ่ม Enter หากการตั้งค่าถูกต้องจะแสดงชื่อโปรแกรม java และเวอร์ชั่นของโปรแกรมดังภาพ
และทดสอบพิมพ์คำสั่ง 'ant -version' และกดปุ่ม Enter เพื่อดูผลลัพธ์เช่นเดียวกัน

7. ขั้นตอนถัดมาให้สร้างฐานข้อมูลและชื่อผู้ใช้ฐานข้อมูลของโปรแกรม dspace ก่อนการติดตั้งโปรแกรม dspace โดยตั้งค่าการใช้งานผ่านโปรแกรม pgAdmin III (คลิกที่ปุ่ม Start -> pgAdmin III)

จะปรากฎหน้าต่างโปรแกรม pgAdmin III ให้คลิกเมาส์ขวาที่ชื่อ PostgreSQL 9.5 (x86) (localhost:5432) และคลิกที่ Connect เพื่อเชื่อมต่อการใช้งานฐานข้อมูล

โปรแกรมจะถามรหัสผ่านที่กำหนดไว้ ให้ใส่รหัสผ่านของ user ที่ชื่อ postgres ที่ตั้งไว้ก่อนหน้านี้ และคลิกปุ่ม OK เพื่อยืนยัน

คลิกเมาส์ขวาที่ชื่อ Login Roles (1) และคลิกที่ชื่อ New Login Role... เพื่อสร้างชื่อ login ของ dspace

ที่บรรทัด Role name พิมพ์ชื่อ 'dspace'

ถัดมาคลิกที่แถบหน้าต่าง Definition และตั้งรหัสผ่านให้กับผู้ใช้ชื่อ dspace
(อย่าลืมบันทึกรหัสผ่านไว้เพื่อกันลืม !!)

คลิกที่แถบหน้าต่าง Role privileges เพื่อคลิกเลือกกำหนดสิทธิ์ต่าง ๆ ให้กับผู้ใช้ชื่อ dspace ดังภาพด้านล่าง
(Inherits rights from parent roles / Superuser / Can create databases / Can create roles)
และคลิกปุ่ม OK เพื่อบันทึกค่าการสร้างผู้ใช้ชื่อ dspace

ถัดมาให้สร้างฐานข้อมูลชื่อ dspace โดยคลิกเมาส์ขวาที่ Databases และคลิกเลือก New Database..

ที่แถบหน้าต่าง Properties ในช่อง Name พิมพ์ชื่อ 'dspace' และช่อง Owner พิมพ์ชื่อ 'dspace'

ถัดมาคลิกที่แถบหน้าต่าง Definition และคลิกเลือก Encoding เป็นแบบ UTF-8 และช่อง Tablespace คลิกเลือกแบบ pg_default และคลิกปุ่ม OK เพื่อบันทึกการตั้งค่า

ถัดมาให้ดับเบิ้ลคลิกที่ฐานข้อมูลชื่อ 'dspace ' เพื่อเชื่อมต่อการใช้งานและการเรียกดูข้อมูล

จะแสดงการเชื่อมต่อดังภาพด้านล่าง

ถัดมาให้เพิ่ม Extension ชื่อ pgcrypto โดยคลิกเมาส์ขวาที่ชื่อ Extensions (2) -> New Extension..
(โดยการติดตั้ง pgcrypto จะถูกบังคับให้ติดตั้งใน dspace ตั้งแต่เวอร์ชั่น 6 เป็นต้นไป
หากไม่ติดตั้งแล้ว จะพบปัญหาการติดตั้ง dspace ในภายหลังได้)

ที่แถบ Properties ในช่อง Name พิมพ์ 'pgcrypto'

ที่หน้าต่างแถบ Definition , ในช่อง Scheme คลิกเลือก public และในช่อง Version คลิกเลือก 1.2
และคลิกปุ่ม OK เพื่อบันทึกการตั้งค่า

โปรแกรมจะดำเนินการเพิ่ม extensions ชื่อ 'pgcrypto' ขึ้นมาให้ใหม่

ให้เปิดหน้าต่างโปรแกรม pgAdmin III ค้างไว้ก่อน ยังไม่ต้องปิด และไปทำในขั้นตอนถัดไป
8. สร้างโฟลเดอร์ในไดร์ฟ c:\ ขึ้นมาใหม่ โดยตั้งชื่อ 'dspace' เพื่อเตรียมไว้ก่อนเริ่มติดตั้งโปรแกรม dspace

9. เริ่มขั้นตอนการติดตั้งโปรแกรม dspace โดยไปที่หน้าต่าง windows command prompt
และไปที่ไดเรกทอรี
c:\dspace-6.0-src-release\dspace

และพิมพ์คำสั่ง mvn package เพื่อติดตั้งและเริ่มการดาวน์โหลดโปรแกรมผ่านทางอินเทอร์เนต

ในขั้นตอนนี้จะใช้เวลานานที่สุด สำหรับการติดตั้งโปรแกรม dspace จากตัวอย่างที่แสดงให้เห็นผลการทดสอบการติดตั้งใช้เวลาประมาณ 28 นาที

เมื่อเสร็จสิ้นการดาวน์โหลดโดยใช้คำสั่ง 'mvn package'
หากการติดตั้งสำเร็จ โปรแกรมจะแสดงข้อความ 'BUILD SUCCESS'
และแสดงระยะเวลาการติดตั้งทั้งหมด แต่หากการติดตั้งไม่สำเร็จจะแสดงข้อความ 'BUILD FAILED'

ทำการเปลี่ยนไดเรกทอรีไปที่โฟลเดอร์
c:\dspace-6.0-src-release\dspace\target\dspace-installer
และพิมพ์คำสั่ง ant fresh_install เพื่อติดตั้งในขั้นตอนถัดไป

ใช้เวลารอประมาณสัก 3-6 นาที จะแสดงข้อความ 'BUILD SUCCESSFUL'

10. ลำดับถัดมาให้สร้างชื่อผู้ดูแลระบบโปรแกรม dspace โดยไปที่ไดเรกทอรี c:\dspace\bin
และพิมพ์คำสั่ง dspace create-administrator

11. ทำการกรอกข้อมูลตามโปรแกรมแจ้งบนหน้าจอ ประกอบด้วยข้อมูลดังนี้ :
E-mail address / First name / Last name / Password /
เมื่อกรอกข้อมูลครบแล้ว ให้พิมพ์ y เพื่อยืนยันและบันทึกการตั้งค่า

12. สั่ง start service ของ Web Server ที่หน้าต่าง windows command prompt
โดยพิมพ์คำสั่ง %CATALINA_HOME%\bin\startup.bat และกดปุ่ม enter

ในการใช้งานครั้งแรก โปรแกรม Windows Firewall ของเครื่องจะถามถึงความปลอดภัย
ให้คลิกที่ปุ่ม Allow access เพื่อยืนยันความปลอดภัย

รอสักครู่ให้ปรากฎข้อความ ' Server startup in ... ' หมายถึง web server เริ่มการทำงาน

ทดลองเรียกหน้าเว็บโปรแกรม dspace โดยเปิด browser และพิมพ์
http://localhost:8080/jspui
ถ้าพบข้อความผิดพลาดแจ้งว่า 'HTTP Status 404' แสดงว่ามีการกำหนดค่าการใช้งานไม่ถูกต้อง
ให้ดำเนินการในขั้นตอนถัดไป
(ตัวอย่างในลำดับถัด ๆ ไป จะแสดงให้เห็นถึงปัญหาที่อาจเกิดขึ้นจากการติดตั้งโปรแกรม dspace ในมุมมองต่าง ๆ และแนวทางแก้ไขปัญหาที่เกิดขึ้น)

ถัดมาให้ไปที่ไดเรกทอรีชื่อ c:\dspace\webaspps และ copy โฟลเดอร์ชื่อ 'jspui' ไปไว้ในไดเรกทอรีชื่อ
c:\apache-tomcat-7.0.69\webapps\ROOT


เมื่อ copy ข้อมูลเสร็จแล้วให้กลับไปหน้า browser อีกครั้ง และทดลองเรียกเว็บไซต์ http://localhost:8080/jspui
หากพบปัญหาใหม่ แจ้งข้อความผิดพลาด ' HTTP Status 500...' ให้ไปยังขั้นตอนในลำดับถัดไป

ให้ย้ายโฟลเดอร์ชื่อ 'jspui' ออกจากไดเรกทอรีชื่อ ROOT และนำมาไว้ที่โฟลเดอร์
c:\apache-tomcat-7.0.69\webapps และเปลี่ยนชื่อโฟลเดอร์ ROOT เป็นชื่ออื่น
(จากตัวอย่างเปลี่ยนโฟลเดอร์ชื่อ ROOT เป็น ROOT-old)

ถัดมาให้ทำการเปลี่ยนชื่อโฟลเดอร์ 'jspui' เป็นโฟลเดอร์ชื่อ 'ROOT'

ทดลองเรียก url -> http://localhot:8080/jspui ที่หน้าเว็บ browser อีกครั้ง
แต่พบปัญหาใหม่คือ ไม่มีข้อมูลใด ๆ แสดงบน หน้าเว็บ ให้ข้ามไปยังขั้นตอนถัดไป

กลับไปยังหน้าต่าง windows command prompt และสั่งปิดการทำงานของ web server โดยพิมพ์คำสั่ง
%CATALINA_HOME%\bin\shutdown.bat

และสั่งให้ service ของ web server ทำงานอีกครั้งโดยพิมพ์คำสั่ง
%CATALINA_HOME%\bin\startup.bat
ทดลองเรียกหน้าเว็บ อีกครั้ง --> http://localhost:8080
แต่พบปัญหาใหม่อีก แจ้งข้อความผิดพลาด 'Internal System Error...' ให้ข้ามไปยังขั้นตอนถัดไป


ให้กลับไปยังไดเรกทอรีชื่อ c:\dspace\webapps และ copy โฟลเดอร์ภายในทั้งหมด ยกเว้นโฟลเดอร์ชื่อ 'jspui' (เนื่องจาก copy ไปก่อนหน้านี้แล้ว)

และนำโฟลเดอร์ที่ copy ไว้ มาวาง (paste) ในโฟลเดอร์ชื่อ c:\apache-tomcat-7.0.69\webapps

ขั้นตอนถัดมา ให้ทดลองสั่ง start service การทำงานของ Web Server อีกครั้ง ด้วยคำสั่ง
%CATALINA_HOME%\bin\startup.bat
หากพบปัญาแจ้งข้อความผิดพลาด--> .. java.lang.OutOfMemoryError .. หรือ
ไม่สามารถให้ web server ทำงานได้
ให้ดำเนินการแก้ไขตามแนวทางในขั้นตอนถัดไป
โดยสร้างไฟล์ชื่อ 'setenv.bat'
และเก็บไว้ในไดเรกทอรีชื่อ 'c:\apache-tomcat-7.0.69\bin'

setenv.bat (คลิกที่นี่เพื่อดาวน์โหลดไฟล์)
(แหล่งอ้างอิงข้อมูลการสร้างไฟล์ 'setenv.bat', :
set JAVA_OPTS=-Dfile.encoding=UTF-8 -Xms128m -Xmx1024m -XX:PermSize=64m -XX:MaxPermSize=256m

เมื่อสร้างไฟล์ setenv.bat เสร็จแล้ว ให้กลับไปที่หน้าต่าง windows command prompt
และสั่ง restart catalina โดยไปที่ไดเรกทอรี c:\apache-tomcat-7.0.69\bin
และพิมพ์คำสั่ง catalina.bat restart

ทดลองสั่ง start service ของ Web Server อีกครั้งโดยพิมพ์คำสั่ง
%CATALINA_HOME%\bin\startup.bat

รอกระทั่งปรากฎข้อความ ' Server startup in ... '

กลับไปทดสอบเรียกหน้าเว็บอีกครั้ง
http://localhost:8080
จะพบว่าสามารถเรียกหน้าเว็บ dspace ได้เป็นปกติ ไม่พบข้อผิดพลาด

Keyword: install dspace 6 on windows, install dspace 6 ,ติดตั้ง dspace, install dspace, institutional repository, ir, คลังข้อมูล, คลังสารสนเทศ, คลังสถาบัน, คลังเอกสาร, ติดตั้ง dspace 6, ติดตั้งดีเสปซ, dspace 6 on windows, การใช้งาน dspace เบื้องต้น, คู่มือการใช้ dspace, dspace คู่มือ, โปรแกรม dspace, การติดตั้ง dspace, การติดตั้ง dspace 6, , dspace installation on windows, dspace installation on centos, dspace installation step by step, dspace 6 installation, dspace 6.0 installation
Subscribe to:
Comments (Atom)


